Read the below given set of instructions carefully if you are facing mic/headset related issues like speaking section answers not getting recorded in mocks tests or low sound levels in practice questions.
Microphone is not working properly during mock test
- Please check for loose connections and perform microphone configuration again (refer video below)
- Ask the user to speak clearly in microphone.
- We recommend only wired headsets like the ones shown in the image:

If the problem still persists, then please ensure the following:
- Wire was not loose during the exam.
- User was speaking clearly in microphone.
- User(s) placed microphone properly near their mouth, as shown:
- You are using software on Chrome Browser.
- Check if your Chrome Browser is up-to-date or not (refer video below)

If an issue still persists, then keep us informed about the same. Although setting mic-configuration with your headsets and clearly speaking into it should solve it.
Microphone Settings for Fast Recordings
If you're encountering problems with your audio recordings playing back too fast, means the pitch and pace sound like the Chipmunks, adjusting the microphone's Default Format to a lower quality, such as Tape Recorder Quality, might help. Here’s how you can do it:
-
Access Sound Settings: Right-click the Sound icon on your taskbar and select Sounds. Alternatively, you can access this through the Control Panel by selecting Hardware and Sound > Sound.
-
Navigate to Recording Devices: In the Sound window, switch to the Recording tab. Here, you’ll see a list of available recording devices. Find your microphone in the list. It’s usually named after the device itself or the connected headset.
-
Microphone Properties: Right-click on your microphone and select Properties. This will open a new window with several tabs.
-
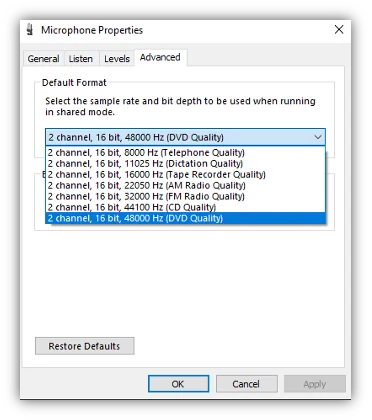
Adjust Default Format: Go to the Advanced tab. Under the Default Format section, you’ll find a dropdown menu with various quality options.
- To address the issue of recordings playing back too fast, select a lower quality setting. Look for options labeled as 8000 Hz (Telephone Quality), you can even try 16000 Hz (Tape Recorder Quality) but do not go above that. While these settings reduce audio fidelity, they can also minimize playback speed issues by ensuring the recording and playback sample rates are compatible.
-
Apply Changes: After selecting the desired format, click Apply and then OK to confirm your changes.
-
Exclusive Mode Options: Still in the Advanced tab, consider adjusting Exclusive Mode settings. Uncheck Allow applications to take exclusive control of this device and Give exclusive mode applications priority. This can prevent software from changing your audio settings without your consent.
Further Actions
⇨ Remove All Extensions in Chrome Browser
Browser extensions can sometimes interfere with audio recording or playback. To rule out this possibility:
- Open Chrome: Click on the three dots in the upper right corner to access the menu.
- Go to More Tools > Extensions: This opens a page listing all your installed extensions.
- Disable or Remove Extensions: Click the toggle to disable an extension temporarily, or select Remove to delete it entirely. Consider disabling all non-essential extensions to test if this resolves the issue.
⇨ Uninstall and Reinstall Chrome
If the problem persists, and you suspect the browser might be at fault, a fresh install could resolve underlying issues:
- Uninstall Chrome: Open the Control Panel (or Settings app) > Go to Programs and Features (or Apps & features in Settings) > Find and select Google Chrome > Click Uninstall.
- Download the Latest Version: Visit the official Chrome website to download the latest version.
- Install Chrome: Run the downloaded installer and follow the on-screen instructions to reinstall Chrome.
Additional Considerations
- Update Drivers: Ensure your audio and headset drivers are up-to-date. Manufacturer websites often provide the latest drivers.
- Reinstall Audio Drivers: Beyond updating, consider uninstalling and then reinstalling your audio drivers through the Device Manager.
- Check for Interference: Ensure there are no other devices causing interference with your headset or microphone.
- System Updates: Make sure your operating system is up-to-date. Updates can fix bugs and improve compatibility with external devices.
By combining these additional troubleshooting steps with the initial guide, users have a comprehensive set of strategies to address and resolve microphone issues, especially those affecting audio quality and playback speed during recordings. Each step addresses different aspects of the system and software environment, offering multiple angles from which to tackle the problem.
Important: Keep in mind the following:
- Try a wired, 3.5mm jack headset with dedicated microphone (not in-line), i.e. a two cable, double pinned headset.
- No other music/sound device should be connected to your system (like external speakers/home theatre).
- You can decide as per your own choice about the brand and pricing of headsets, while keeping the specifications in mind.
- We suggest you to opt for headphones with 3.5mm dedicated jacks instead of USB connector due to the feature of boost being available in the former.
- Do not use mobile or bluetooth headsets